 Recipes
Flohsamenschalen hatte ich schon länger in meiner Küche. Ich wusste zwar, dass sie u.a. aufgrund des hohen Ballaststoff-Anteils sehr gesund sind. Aber ich war immer ein bisschen ratlos, wo ich sie unterbringen sollte. Ich mixte sie in alle möglichen Soßen, um sie anzudicken. Bis ich auf die Idee kam, dass man ihre Bindeeigenschaft doch auch fürs Backen nutzen können müsste. Also begab ich mich auf die Suche nach Rezepten und Erfahrungen. So stieß ich auf den Blog MyNewRoots, der sehr zu empfehlen ist, und darin auf das Rezept für dieses Brot.
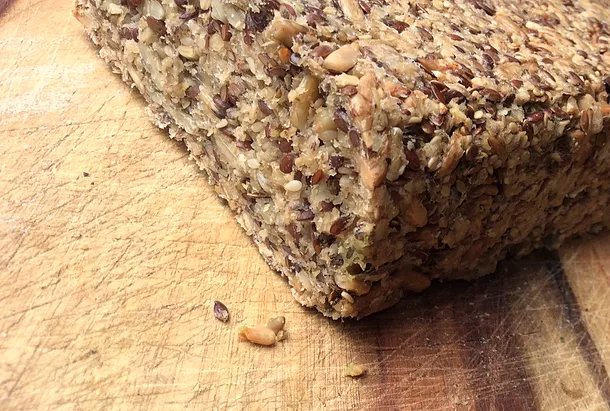
Im Prinzip entsprach es genau meiner Grundidee: Ein Brot aus lauter gesunden Körnern, zusammengehalten nicht von Mehl, sondern von den guten Flohsamenschalen.
Ich machte mich sogleich ans Ausprobieren, und nach einigen Versuchen möchte ich nun meine Variante diesen tollen Brotes mit Euch teilen.
Ihr braucht:
150g Haferflocken
140g aktivierte Sonnenblumenkerne (können auch getrocknet sein)
90g Leinsamen
2 EL Chiasamen
30g Vollkornsesam
3 EL gemahlene Flohsamenschalen (könnt Ihr auch gut selbst mahlen)
1 EL Kokosblütennektar oder Ahornsirup, alternativ 2 Tropfen Stevia
3 EL geschmolzenes mildes Kokosfett
340 ml gefiltertes Wasser
1 TL Salz
1/2 TL Cumin
Mischt alle trockenen Zutaten in einer Schüssel gut durch, dann gebt Wasser, Kokosblütennektar oder Alternative und Kokosfett hinzu. Fertig. Also fast.
Füllt den Teig in eine mit Backpapier ausgelegte Brotform und lasst das ganze mindestens 2 Stunden, am besten über Nacht, aufquellen.

Wenn Euer Teig fertig gequollen ist, heizt den Backofen auf 170° und backt das Brot in der Form für ca 20 Minuten. Dann holt es mit dem Papier aus der Form heraus und stürzt es auf ein Backblech. Lasst es anschließend noch einmal ca 30 Minuten backen. Das Brot ist fertig, wenn es hohl klingt und leicht gebräunt ist.
Gaaanz wichtig ist: So lecker es auch riecht, wenn Ihr es frisch aus dem Ofen holt, lasst es erst komplett abkühlen. Sonst zerfällt es beim Schneiden wieder in seine Einzelteile. Zum Schneiden eignet sich übrigens ein scharfes glattes Messer wesentlich besser als ein normales Brotmesser.
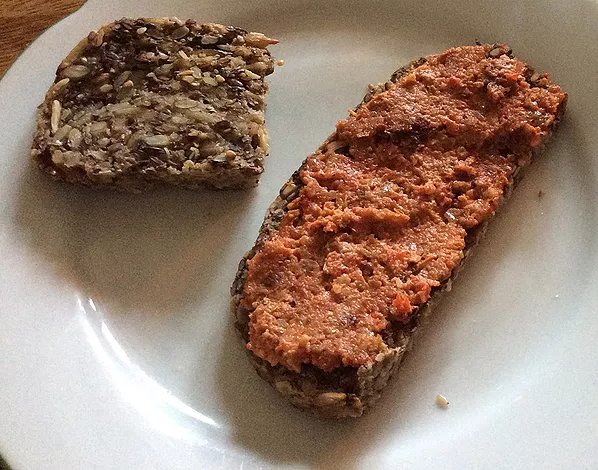
Wir toasten die Brotscheiben vor dem Essen immer noch mal an. Dann wird es noch knuspriger und hat mehr Röstaroma. Man kann die Scheiben auch gut einfrieren und dann einzeln auftauen und toasten.
Das Rezept ist so einfach und man kann es sehr leicht variieren. Das einzige, was nicht austauschbar ist, sind die Flohsamenschalen. Mit allen anderen Körnern könnt Ihr herumspielen, wie Ihr mögt. Hauptsache das Gesamtgewicht bleibt ungefähr gleich.
Genießt es mit Avocado, Cashewkäse oder Paprika-Aufstrich und ein paar Sprossen und Ihr habt eine schnelle, vollwertige und köstliche Mahlzeit.
Flourless Bread
Before I first made this bread, I have had physillum husks in my kitchen for a while. I knew about their health benefits, because they contain so much fibre. But I never really knew what to do with them. I put them in all kinds of sauces to thicken them. Until it dawned on me that it should be possible to use their binding property for baking, too! So I started looking for recipes and experience. This is how I came across the blog
MyNewRoots which you probably know. And if you don’t: have a look, it’s really nice.
There I found the recipe for this bread which was exactly what I had had in mind: A bread made of lots of healthy seeds, bound by physillum husk instead of flour.
I went to give it a try right away and now want to share with you my version of this amazing bread.
You need:
150g rolled oats
140g activated sunflower seeds (can be dried)
90g linseed
2 Tbsp. chia seeds
30g wholegrain sesame
3 Tbsp. physillum husk powder (you can easily grind them yourself)
1 Tbsp. coconut nectar or marple syrup or 2 drops of stevia
3 Tbsp. melted mild coconut oil
340 ml filtered water
1 tsp. salt
1/2 tsp. ground cumin
Mix all dry ingredients in a bowl, then add water, coconut nectar or alternative and coconut oil and mix well. Done. Well, almost.
Put your dough into a bread tin lined with baking paper and let everything sit and soak for at least 2 hours, best over night.
When you’re done soaking, preheat the oven to 170° and bake bread in the tin for about 20 minutes. Then get bread out of the tin, with help of the baking paper and turn it upside down onto a baking tray. Now bake for another 30 minutes. The bread is done when it sounds hollow when tapped and is slightly golden.
Now, the mooost important bit: I know it smells amazing when you get it out of the oven. But you have to wait and let it cool completely! Otherwise it will simply fall apart and you will be left with something that looks like the ingredients you started with!
Once cooled, you can cut it, using a sharp knife rather than a bread knife. We love to toast the slices before eating it with some avocado or cashew cheese.
This recipe is wonderfully simple and easy to adapt. The only thing you can’t substitute is the physillum husk powder. All the other seeds you can swap around, add some nuts (like in the original recipe) or your favourite herbs. Just make sure the overall weight stays roughly the same and your good!